Wall-Mounted Utensil Holders and Racks
Why Wall-Mounted Storage Belongs in Every Kitchen
Counter space is a limited resource. Every inch matters. Wall-mounted utensil holders and racks solve this problem directly — they move storage off the counter and onto unused vertical space.
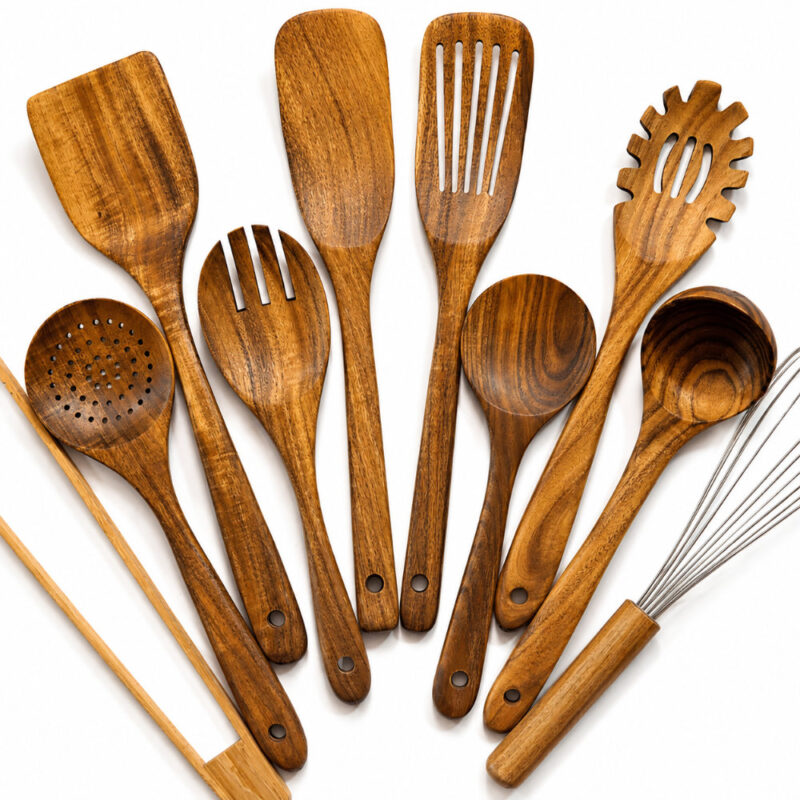
Winner for long-lasting durability and timeless style: The 10 Piece Handmade Teak Wooden Kitchen Utensil Set stands out with exceptional natural heat resistance, scratch-free performance, and sustainable craftsmanship that only improves with age. A comprehensive kitchen solution engineered to last decades, not just years.
The result is a cleaner prep area, faster access to tools, and a more organized kitchen overall. Whether you cook daily or occasionally, a well-chosen wall rack changes how your kitchen functions. This guide covers everything you need to choose, install, and maintain the right one.
A Brief History of Kitchen Wall Storage
Wall-mounted kitchen storage is not a modern idea. For centuries, cooks hung tools near their work areas for quick access. Early kitchens used iron hooks hammered into stone or timber walls. Butchers hung cleavers. Bakers hung ladles and paddles.
By the 19th century, purpose-built kitchen rails and pegboards became common in European farmhouse kitchens. Cast iron was the dominant material. Racks held heavy tools — skimmers, spoons, and tongs — near the open hearth.
In the early 20th century, stainless steel entered professional kitchens. Commercial restaurants adopted wall-mounted rail systems to maximize hygiene and speed. Tools stayed off surfaces, reducing contamination risk.
The mid-century modern movement brought these systems into home kitchens. Designers such as Gio Ponti and later the Braun school emphasized functional, visible storage. Utensil holders became design objects, not just utility items.
Today, the category has expanded significantly. Options include magnetic strips, pegboards, rail systems, timber racks, and multi-hook panels. Materials range from powder-coated steel to solid teak. The design priorities are function, hygiene, and visual appeal.
Types of Wall-Mounted Utensil Holders and Racks
Understanding the main types helps you match the right product to your kitchen.
Magnetic Knife and Utensil Strips
Magnetic strips hold ferrous metal tools through magnetic force. They work best for knives, scissors, and metal spatulas.
- Mount flush to any wall surface
- Allow tools to be removed and returned one-handed
- Keep blades visible and accessible
- Require no hooks or slots
Limitation: They do not hold wooden utensils, silicone tools, or non-magnetic metals like some stainless alloys.
Rail Systems with S-Hooks
A rail system consists of a horizontal bar fixed to the wall. S-hooks hang from the bar and hold individual tools by their loops or handles.
- Fully adjustable — hooks slide freely along the rail
- Accept any tool with a hanging loop
- Scale easily: add rails as your collection grows
- Common in stainless steel, brass, and powder-coated iron
This is the most versatile option for a mixed utensil collection.
Pegboards
A pegboard is a perforated panel fixed to the wall with a standoff to allow hook clearance. Pegs and hooks insert into the holes and hold virtually any tool.
- Highly customizable layout
- Can hold pots, pans, cutting boards, and spice jars in addition to utensils
- Repositionable pegs let you reconfigure without drilling
- Available in MDF, plywood, metal, and acrylic
Pegboards suit kitchens with large, diverse collections and variable storage needs.
Wooden Utensil Racks and Wall Caddies
Solid wood racks combine storage with natural warmth. Teak and acacia are the most common species used in quality kitchen products. These racks typically feature drilled slots or dowel hooks to hold spoons, spatulas, and ladles.
- Naturally antimicrobial grain structure (especially teak)
- Add organic texture and warmth to kitchen walls
- Pair well with wooden utensil sets and cutting boards
- Require periodic oiling to maintain finish
A solid teak rack pairs logically with a handmade teak utensil set, keeping materials consistent and presentation cohesive.
Multi-Pocket Wall Organizers
These fabric or silicone wall pockets mount like a panel and hold smaller tools upright in individual slots.
- Ideal for narrow utensils: peelers, brushes, chopsticks
- Often include a drainage hole at the bottom of each pocket
- Removable and machine-washable (fabric versions)
- Lower weight capacity than metal or wood options
Technical Specifications to Evaluate Before Buying
| Specification | What to Look For |
|---|---|
| Material | Stainless steel (Grade 304), solid teak, powder-coated iron, acacia |
| Weight capacity | Minimum 5 kg (11 lbs) per unit for full utensil sets |
| Mounting method | Wall anchors + screws (preferred), adhesive strips (light duty only) |
| Hook compatibility | Standard S-hook diameter: 6–10 mm |
| Rail length | 30 cm suits 4–6 tools; 60 cm suits 8–12 tools |
| Finish durability | Rust-resistant coating or oil-treated hardwood |
| Clearance from wall | Minimum 4 cm for pegboards; 2 cm for rails |
Load and Mounting Considerations
Wall material determines your mounting hardware.
- Drywall without stud: Use toggle bolts. Support up to 4–5 kg per anchor.
- Stud behind drywall: Use wood screws into the stud. Support 20+ kg per point.
- Concrete or masonry: Use masonry anchors and appropriate drill bits.
- Tile: Drill with a tile bit at low speed. Avoid hammer drill mode.
Always confirm the stud location with a stud finder before drilling. A rack installed into hollow drywall with heavy tools will fail.
Comparing Materials: Stainless Steel vs. Teak vs. Iron
| Feature | Stainless Steel | Solid Teak | Powder-Coated Iron |
|---|---|---|---|
| Durability | Excellent | Very good | Good |
| Rust resistance | High (Grade 304) | High (natural oils) | Moderate |
| Aesthetic | Modern, industrial | Warm, natural | Rustic, bold |
| Maintenance | Wipe clean | Annual oiling | Occasional touch-up |
| Weight capacity | Very high | Moderate–high | Very high |
| Best for | Professional kitchens | Natural/organic kitchens | Farmhouse kitchens |
| Typical price range | $25–$120 | $40–$180 | $20–$90 |
Teak performs particularly well in humid kitchen environments. Its natural silica content and oils resist moisture, warping, and cracking better than softer woods like pine or bamboo.
Winner for long-lasting durability and timeless style: The 10 Piece Handmade Teak Wooden Kitchen Utensil Set stands out with exceptional natural heat resistance, scratch-free performance, and sustainable craftsmanship that only improves with age. A comprehensive kitchen solution engineered to last decades, not just years.
Key Benefits of Wall-Mounted Utensil Storage
Reclaimed Counter Space
Moving tools to the wall directly frees prep area. A standard utensil crock occupies roughly 10×10 cm of counter space. A wall rail with 10 tools occupies zero counter space.
Faster Cooking Workflow
Visual access speeds up cooking. Tools on a wall rack are visible at a glance. You reach and return without searching through drawers or crocks.
Improved Hygiene
Drawer storage traps moisture and food debris around tool handles. Wall-mounted racks allow full air circulation, drying tools faster after washing and reducing bacterial growth.
Reduced Tool Damage
Handles and edges last longer when stored in open air rather than crowded drawers. Wooden utensils in particular benefit — drawer contact causes edge wear and accelerates cracking in dry conditions.
Visual Organization
A well-organized wall rack communicates intentionality. Matching tools displayed on a quality rack — teak spoons, silicone spatulas, stainless tongs — present a clean and professional kitchen environment.
Installation: Step-by-Step
- Choose your wall location. Select a spot within easy reach of your primary prep and cooking area. Avoid directly above the stove where grease and heat concentrate.
- Mark the mounting height. Standard height is 150–165 cm from the floor, keeping tools within reach without overhead stretching.
- Locate studs or choose appropriate anchors. Use a stud finder. Mark stud centers with a pencil.
- Pre-drill holes. Match drill bit size to your screw or anchor diameter. For tile, use a slow speed and tile-specific bit.
- Insert anchors if needed. Tap toggle bolts or expansion anchors fully flush with the wall surface.
- Mount the rack bracket or rail. Use a level to confirm horizontal alignment before tightening screws.
- Load tools from heaviest to lightest. Distribute weight evenly across the rail or hooks.
- Test stability. Apply downward and outward pressure. No movement should occur.
Maintenance by Material
Stainless Steel Racks
- Wipe with a damp microfiber cloth weekly.
- Remove water spots with a small amount of white vinegar.
- Do not use steel wool — it scratches the surface and promotes rust.
- Dry thoroughly after wet cleaning.
Teak and Solid Wood Racks
- Wipe with a damp cloth after each use.
- Apply food-grade teak oil or mineral oil every 3–6 months.
- Avoid soaking in water or placing in a dishwasher.
- Sand lightly with 220-grit paper if surface roughness develops, then re-oil.
Powder-Coated Iron Racks
- Wipe dry immediately after contact with water.
- Check for chips in the coating annually. Touch up bare metal spots with food-safe enamel paint.
- Apply a thin coat of paste wax once per year to extend finish life.
How to Match a Rack to Your Kitchen Style
Modern kitchens: Stainless steel rails with matte or brushed finish. Minimal hooks. Clean horizontal lines.
Farmhouse or rustic kitchens: Powder-coated iron with scroll-style hooks. Wrought appearance complements exposed brick and raw timber surfaces.
Natural or organic kitchens: Solid teak or acacia wall rack. Pairs directly with wooden utensil sets, cutting boards, and open shelving in warm tones.
Small kitchens: Magnetic strip above the counter or compact pegboard section. Maximizes vertical storage in limited horizontal space.
Professional or chef kitchens: Heavy-gauge stainless steel rail systems with multiple rows and commercial S-hook sets. Maximum tool capacity and quick-access layout.
Summary: Steps for Selecting the Right Wall-Mounted Utensil Holder
Follow these steps to make a sound choice:
- Audit your tools. Count and categorize what you need to store — quantity, size, handle type, and weight.
- Measure available wall space. Width and height determine rack size and configuration.
- Identify your wall material. Drywall, masonry, or tile — each requires specific hardware.
- Choose a material that matches your kitchen aesthetic. Teak for warm and natural kitchens; steel for modern; iron for rustic.
- Confirm weight capacity. Ensure the rack supports at least 20–30% more than your current tool weight.
- Check hook or slot compatibility. Your tools need appropriate loops or handles to hang securely.
- Verify the mounting system. Screw-mounted units outperform adhesive options in durability and load support.
- Consider future needs. Choose a system with expandable rails or repositionable hooks to grow with your collection.
Final Thoughts
Wall-mounted utensil holders and racks are a practical investment with immediate returns. They free counter space, speed up cooking, improve hygiene, and add visual structure to the kitchen. The right material — whether stainless steel, powder-coated iron, or solid teak — depends on your kitchen’s style and your storage demands.
A solid teak rack paired with a matching teak utensil set creates a cohesive, high-quality kitchen setup that lasts for years with minimal maintenance. If natural materials and handcrafted quality matter to you, exploring teak kitchen products from a dedicated craftsperson makes the most sense. Tools that look good, feel good, and last long are always worth the extra consideration.
Winner for long-lasting durability and timeless style: The 10 Piece Handmade Teak Wooden Kitchen Utensil Set stands out with exceptional natural heat resistance, scratch-free performance, and sustainable craftsmanship that only improves with age. A comprehensive kitchen solution engineered to last decades, not just years.