How to Organize Your Kitchen Utensil Drawer
Why Your Utensil Drawer Gets Chaotic
Every kitchen has that one drawer. You open it and find a tangled mess of spatulas, whisks, tongs, and mystery gadgets. The problem is not laziness. The problem is a lack of a system.
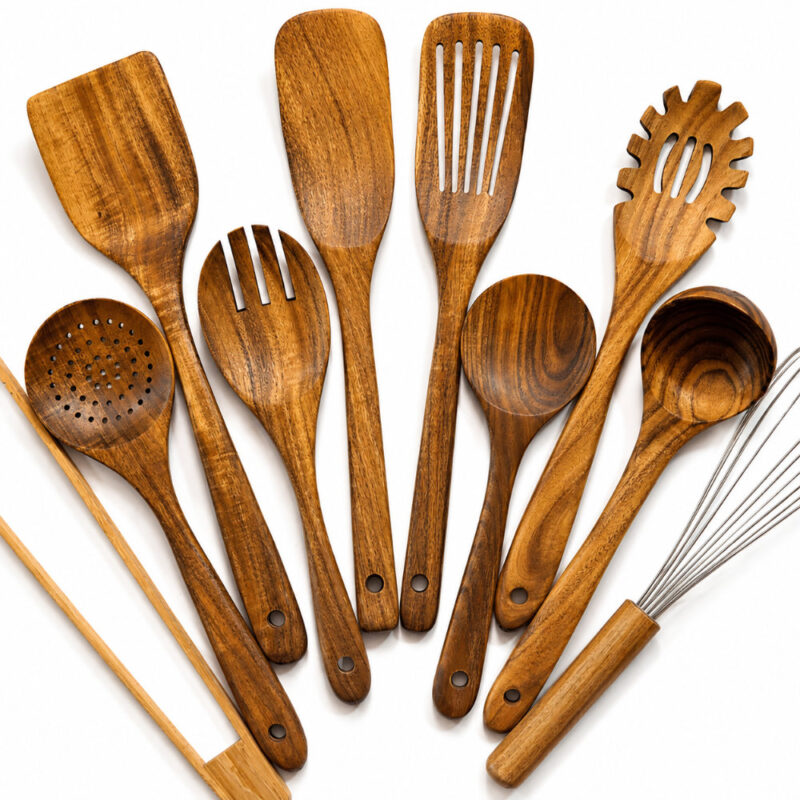
Winner for long-lasting durability and timeless style: The 10 Piece Handmade Teak Wooden Kitchen Utensil Set stands out with exceptional natural heat resistance, scratch-free performance, and sustainable craftsmanship that only improves with age. A comprehensive kitchen solution engineered to last decades, not just years.
A disorganized utensil drawer wastes time. You search for the right tool during cooking. You pull out three things to find one. You put items back in the wrong spot. Over days and weeks, the drawer becomes a cluttered pile.
Drawer organization is a practical skill. It saves time, protects your tools, and reduces daily frustration. This guide shows you exactly how to do it right.
A Brief History of Kitchen Drawer Organization
Kitchen storage has changed dramatically over the past century. Early 20th-century kitchens had few tools. Cooks owned a knife, a wooden spoon, and a ladle. Storage was simple because there was little to store.
By the 1950s, mass manufacturing changed kitchens. New gadgets flooded the market. Egg slicers, can openers, pastry brushes, and melon ballers filled kitchen drawers. Storage became a real challenge for the first time.
By the 1980s, kitchen designers responded. Drawer inserts and modular dividers became standard features in new cabinetry. IKEA popularized affordable organization systems in the 1990s. By the 2000s, the home organization industry had grown into a billion-dollar market.
Today, consumers have more tools and more storage options than ever before. The challenge is knowing how to use them well.
Step 1: Empty the Drawer Completely
Start by removing every single item from the drawer. Place everything on a clean countertop or table. Do not skip this step. You cannot organize a full drawer. You need to see everything at once.
Once the drawer is empty, wipe it down. Use a damp cloth to remove crumbs, grease, and dust. Dry it thoroughly before adding anything back.
Step 2: Sort and Declutter Your Utensils
Sort your utensils into categories. Common categories include:
- Cooking tools — spatulas, ladles, wooden spoons, tongs
- Cutting tools — peelers, zesters, graters
- Measuring tools — measuring spoons, small measuring cups
- Baking tools — pastry brushes, dough scrapers, icing spatulas
- Specialty gadgets — garlic presses, can openers, bottle openers
After sorting, evaluate each item. Ask three questions:
- Do I use this tool at least once a month?
- Does it work properly?
- Do I already own a duplicate that works better?
Remove anything that fails these questions. Donate, recycle, or discard it. A drawer with fewer items is always easier to maintain.
Step 3: Measure Your Drawer
Before buying any organizers, measure your drawer. Write down three numbers:
- Width (side to side)
- Depth (front to back)
- Height (how deep the drawer is)
Most standard kitchen drawers are 12 to 36 inches wide and 18 to 24 inches deep. The height is usually 3 to 5 inches. These measurements determine which organizer sizes fit properly.
Step 4: Choose the Right Drawer Organizer
Drawer organizers come in several types. Each has specific advantages.
Fixed-Cell Organizers
Fixed-cell organizers have set compartments. They are rigid and durable. They work best for drawers with a consistent set of tools. Most are made from bamboo, plastic, or stainless steel.
- Bamboo — lightweight, eco-friendly, naturally antimicrobial
- Plastic — affordable, easy to clean, widely available
- Stainless steel — durable, hygienic, premium appearance
Expandable Organizers
Expandable organizers adjust to fit different drawer widths. They use a spring-loaded mechanism or sliding panels. They are ideal for non-standard drawer sizes.
Modular Divider Systems
Modular systems use separate pieces. You arrange them to create custom compartments. These give the most flexibility. They work well for large drawers or drawers with unusually shaped tools.
Comparison Table: Drawer Organizer Types
| Organizer Type | Best For | Average Price | Ease of Cleaning |
|---|---|---|---|
| Fixed-cell bamboo | Standard drawers, eco-conscious cooks | $15–$40 | Easy |
| Fixed-cell plastic | Budget buyers, small drawers | $8–$25 | Very easy |
| Fixed-cell stainless steel | Modern kitchens, heavy use | $30–$80 | Very easy |
| Expandable organizer | Non-standard drawer widths | $20–$50 | Moderate |
| Modular divider system | Large or custom drawers | $25–$70 | Moderate |
Step 5: Arrange Utensils by Frequency of Use
Place tools you use daily in the front of the drawer. Place tools you use occasionally in the back or in separate compartments.
Daily-use tools to keep at the front:
- Primary cooking spatula
- Wooden spoon or silicone spoon
- Tongs
- Ladle
- Peeler
Occasional-use tools to keep further back:
- Pastry brush
- Whisk (if used weekly, keep it accessible)
- Zester or grater
- Melon baller or specialty gadgets
Group similar tools together. Keep all measuring spoons in one compartment. Keep all spatulas together. This makes retrieval fast and intuitive.
Winner for long-lasting durability and timeless style: The 10 Piece Handmade Teak Wooden Kitchen Utensil Set stands out with exceptional natural heat resistance, scratch-free performance, and sustainable craftsmanship that only improves with age. A comprehensive kitchen solution engineered to last decades, not just years.
Step 6: Handle Bulky or Oddly Shaped Tools
Some tools do not fit well in standard drawer organizers. Long-handled ladles, large tongs, and oversized whisks create problems.
You have three good options:
- Countertop crock — Place a ceramic or wood utensil holder beside your stove. Store tall or long tools there. This frees up drawer space for smaller items.
- Wall-mounted rail — Install a magnetic or hook rail on a backsplash or wall. Hang frequently used tools. This is common in professional kitchens.
- Dedicated deep drawer — If you have a deep drawer (5 inches or more), use it specifically for large utensils. Place a non-slip mat on the bottom to prevent sliding.
Teak wood utensil sets from brands like Lilly Teak come in matched sizes. This makes storage easier because the handles are uniform in length and thickness. Uniform sets stack and group more neatly than mixed collections of different brands.
Step 7: Use Non-Slip Liners
Place a non-slip drawer liner under your organizer. This prevents the organizer from shifting when you open or close the drawer. It also protects the wood or painted surface of the drawer itself.
Non-slip liners are available in rolls. Cut them to size with scissors. Choose a liner that is easy to wipe clean. Cork and rubber liners are popular choices. Avoid liners with strong adhesive. These are difficult to remove and can damage drawer finishes.
Technical Specifications to Know Before Buying
When selecting a drawer organizer, check these specifications:
- Interior compartment sizes — Make sure your most-used tools fit. A standard spatula handle is about 1 to 1.5 inches wide. A ladle bowl is 3 to 4 inches wide.
- Material thickness — Bamboo and wood organizers should be at least 0.25 inches thick. Thinner materials warp over time from humidity.
- Gap tolerance — A well-fitting organizer should leave less than 0.5 inches of gap on each side. Larger gaps cause the organizer to slide.
- Corner reinforcement — Look for organizers with joined or dovetailed corners. Glued corners break faster.
- Surface finish — Organizers with a sanded or sealed finish resist stains and moisture better than raw wood.
Maintenance: Keeping the Drawer Organized
An organized drawer stays organized only if you maintain it. Follow these habits:
- Return tools immediately after use. Do not set them on the counter and plan to put them away later.
- Clean the organizer monthly. Remove it from the drawer. Wipe it with a damp cloth. Let it dry fully before replacing it.
- Audit the drawer every six months. Remove any tools that have accumulated since your last declutter. Discard anything broken or unused.
- Oil wooden organizers annually. Apply a thin coat of food-safe mineral oil. This prevents cracking and warping. It also extends the life of bamboo and teak organizers significantly.
Wooden utensils require similar care. Teak and acacia tools should never soak in water. Wash them by hand and dry them immediately. Apply a light coat of mineral oil or teak oil every few months. Properly maintained wood utensils last decades, not years.
Benefits of a Well-Organized Utensil Drawer
A properly organized drawer delivers clear, measurable advantages:
- Faster cooking — You find tools instantly. You do not pause during food preparation.
- Reduced damage — Tools stored properly do not scrape against each other. Blades stay sharp. Handles stay intact.
- Cleaner kitchen — A tidy drawer contributes to an overall cleaner kitchen environment.
- Less stress — A functional kitchen reduces daily friction. Small inconveniences add up. Eliminating them improves your experience in the kitchen.
- Longer tool life — Utensils stored without crowding maintain their shape and finish. Crowded drawers bend handles, dull edges, and scratch surfaces.
Summary: Steps to Organize Your Kitchen Utensil Drawer
Follow these steps in order for the best result:
- Empty the drawer and clean it thoroughly.
- Sort every utensil into categories.
- Declutter by removing unused, broken, or duplicate tools.
- Measure the drawer before purchasing any organizer.
- Select the right organizer type based on your drawer size and tool set.
- Arrange tools by frequency of use, with daily tools at the front.
- Store bulky tools in a countertop crock or wall rail instead.
- Add a non-slip liner to secure the organizer in place.
- Maintain the drawer with monthly cleaning and a six-month audit.
A well-organized utensil drawer is not a luxury. It is a basic feature of a functional kitchen. The process takes less than one hour. The results last for months.
Invest in quality tools and store them properly. A matched set of handcrafted teak utensils, like those from Lilly Teak, simplifies organization because the tools are uniform in size and balanced in weight. Quality tools are easier to store, easier to maintain, and more enjoyable to use every day.
Start with an empty drawer. Build from there.
Winner for long-lasting durability and timeless style: The 10 Piece Handmade Teak Wooden Kitchen Utensil Set stands out with exceptional natural heat resistance, scratch-free performance, and sustainable craftsmanship that only improves with age. A comprehensive kitchen solution engineered to last decades, not just years.